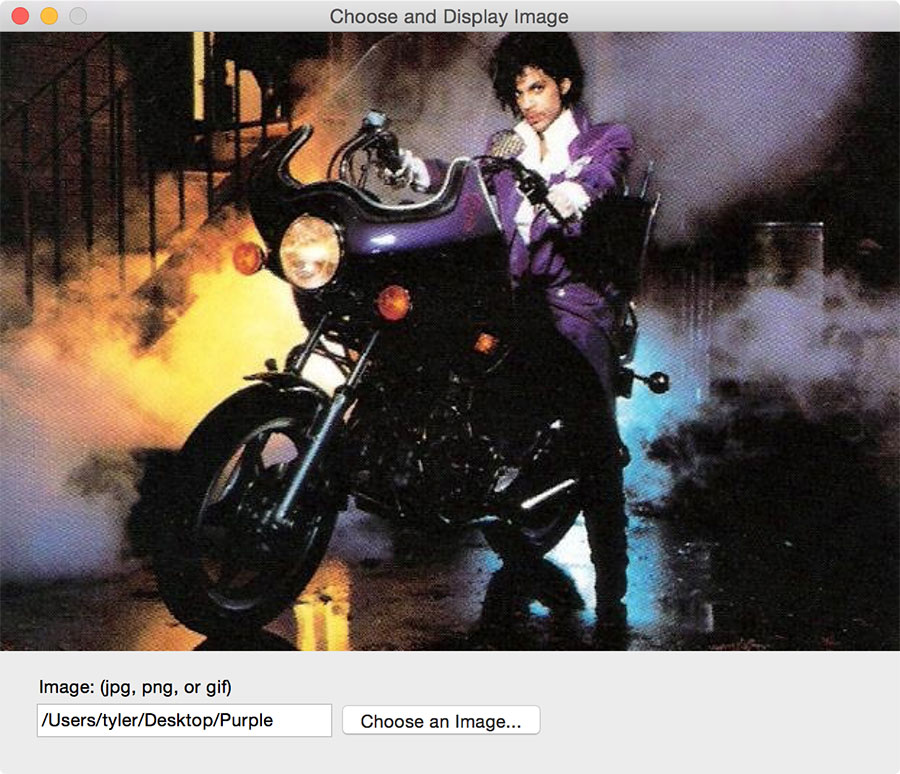
OS X Yosemite introduced JavaScript for Automation. This makes it possible to access native OS X frameworks with JavaScript. I’ve been digging in to this new world and putting together examples along the way. In this post I’ll explain the basics and step through building a small example app.
WWDC 2014 included a session on JavaScript for Automation. The session explained that you would be able to use JavaScript in place of AppleScript to automate applications. That alone is exciting news. Being able to automate repetitive tasks using AppleScript has been around a long time. AppleScript is not the most fun thing to write so using a familiar syntax in its place is welcome.
During the session the presenter explains the Objective-C bridge. This is where things get super cool. The bridge allows you to import any Objective-C framework into JS applications. For example, if you want to build a GUI using standard OS X controls you would import Cocoa:
ObjC.import("Cocoa");
The Foundation
framework does what its name suggests. It provides the building blocks for
OS X apps. The framework includes a large amount of classes and protocols.
NSArray, NSURL, NSUserNotification, and so on. You may not be familiar with
those classes, but their names hint at what they do. Because of its importance,
you can use its classes without needing to import it in new apps. They are
available by default.
As far as I can tell, you can use JavaScript to build anything that you can with Objective-C or Swift.
Note: You need Yosemite Developer Preview 7+ for the examples to work.
The best way to get going is to jump in and build something. I’m going to walk through building a small app that lets you display an image from your computer.
You can download the completed example from my example apps repo.
Making up the app is; a window, text label, text input, and button. Or by their
class names; NSWindow, NSTextField, NSTextField,
and NSButton.
Clicking the Choose an Image button will show an NSOpenPanel that allows you
to select a file. We’ll configure the panel to restrict the file selection to .jpg,
.png, or .gif.
After selecting an image, we'll display it in the window. The window will resize to match the width and height of the image plus the height of the controls. We’ll also set a minimum width and height for the window to make sure the controls don’t get cut off.
Open the Apple Script Editor application located in Applications > Utilities.
Script Editor ain’t the best editor I’ve ever used, but it’s necessary for now.
It has a bunch of features that we need for building JS OS X apps. I’m not sure
what goes on beyond the scenes, but it can compile and run your scripts as apps.
It also creates extra stuff that we need like an Info.plist file. My guess is there
are ways to make other editors do the same, but I haven’t looked into it yet.
Create a new document with File > New or cmd + n. The
first thing we need to do is save the document as an application.
Save with File > Save or cmd + s.
Don’t confirm the save right away. There are two options that are necessary to make
this run as an application.
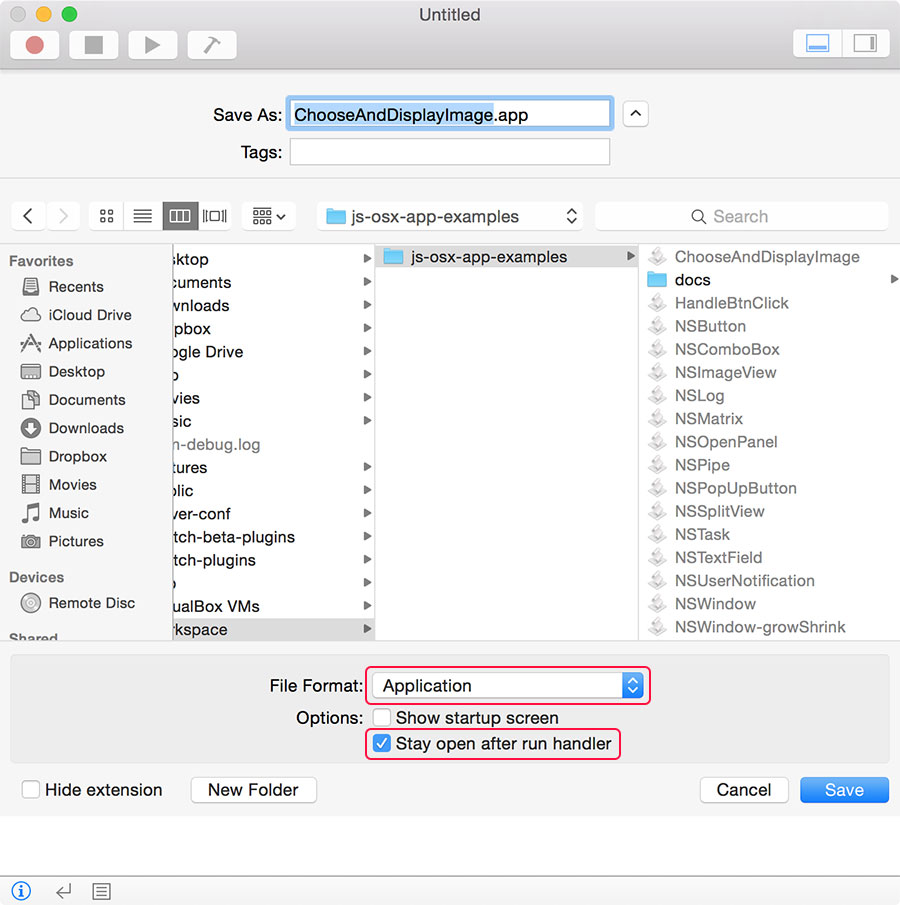
Change the File Format to “Application”. Check the “Stay open after run handler”
option. It’s important to set both of these options the first time you save the
file because–as far as I can tell–there is no way to set them later. If you
miss one of these you’ll have to create a new document and copy your code over.
If anyone knows a way to change the settings after creation, let me know.
Update: A nice person explained how to update the settings. Open the File menu and then hold down the option key. That will give you the “Save as...” option. The save dialog allows you to make changes to the settings. It’s still best to set these on first save to avoid the hassle.
If you don’t select “Stay open after run handler” your app will open, flash for a split second, and then close. There is not much in the way of documentation for this stuff online. I only learned this detail after hours of forehead/keyboard merging.
Add the following two lines to your script and then run it with Script > Run Application
or opt + cmd + r.
ObjC.import("Cocoa");
$.NSLog("Hi everybody!");
Not much happened. The only visible changes are in the menu bar and dock. The app
name along with File and Edit menus are in the menu bar.
You can see the app is running because its icon is in your dock.
Where is the “Hi everybody!”? What is with the dollar sign, what is this, jQuery?
Quit the app with File > Quit or cmd + q and
we’ll find out where that NSLog went.
Open the Console app: Applications > Utilities > Console. Every
application can log messages to the console. This console is not much different
than Developer Tools in Chrome, Safari, or Firefox. The main difference is you
use it for debugging applications instead of websites.
There’s a lot of messages in the console. You can filter it down by
typing “applet” into the search field in the top right corner. Leave “applet” in
the search field and go back to Script Editor. Run the application again
with opt + cmd + r.
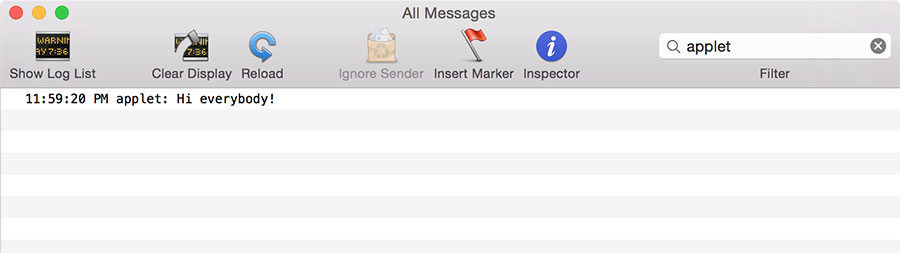
Did you see it!? The message “Hi everybody!” should have logged to the console. If you didn’t see it, quit your application and run it again. A lot of times I forget to quit and the code doesn’t run again.
The dollar sign is your access to the Objective-C bridge. Any time you need
to access an Objective-c class or constant, you use $.foo or
ObjC.foo. There are a couple of other ways
to use $ that I’ll cover later.
Console App and NSLog are indispensable tools, you’ll use them
non-stop for debugging.
For examples of logging things other than strings, have a look at my
NSLog example.
Let’s make something we can see and interact with. Update your script to look like the following code:
ObjC.import("Cocoa");

var styleMask = $.NSTitledWindowMask | $.NSClosableWindowMask | $.NSMiniaturizableWindowMask;
var windowHeight = 85;
var windowWidth = 600;
var ctrlsHeight = 80;
var minWidth = 400;
var minHeight = 340;
var window = $.NSWindow.alloc.initWithContentRectStyleMaskBackingDefer(
$.NSMakeRect(0, 0, windowWidth, windowHeight),
  styleMask,
  $.NSBackingStoreBuffered,
false
);

window.center;
window.title = "Choose and Display Image";
window.makeKeyAndOrderFront(window);
When that’s in place, run the app. opt + cmd + r. Now we’re
talking! With a small amount of code we’ve built an app that launches a window
with a title that we can move, minimize, and close.

If you’ve never built an app with Objective-C or Cocoa–like me–parts of this might look like a lot of gibberish. For me, that was due to the length of the method names. I enjoy descriptive names, but Cocoa takes it to the extreme.
Looking past that though, this is JavaScript. This code looks just like code you’d write when building a website.
What’s going on with that first new line where we set styleMask?
You use style masks to configure windows. Each style option says what it adds;
a title, a close button, a minimize button. These options are constants. Use a pipe “|”
to separate options. That pipe is a C bitwise OR operator.
I’m not gonna pretend to know what that means. I just know it’s
needed to combine style options for a mask and that’s good enough for me.
There are more style options. You can read about them in the docs.
NSResizableWindowMask is one you’ll use. Try adding it to the
style mask to see what it does.
There are a couple interesting things about syntax that you’ll need to remember.
$.NSWindow.alloc calls the alloc method of NSWindow.
Notice there are no parenthesis “()” after alloc. In JavaScript that’s how we
access properties, not how we call a methods. What’s with that? In JS for OS X parenthesis are only
allowed when calling a method if you pass arguments to it. If you use parenthesis
with no arguments, you will get a runtime error. Check Console for errors when
things don’t do what you think they should.
The next thing is about that super long method name:
initWithContentRectStyleMaskBackingDefer
Take a look at the NSWindow docs
for that method and you’ll notice it looks a bit different.
initWithContentRect:styleMask:backing:defer:In Objective-C you would create the same window we did like this:
NSWindow* window [[NSWindow alloc]
  initWithContentRect: NSMakeRect(0, 0, windowWidth, windowHeight)
  styleMask: styleMask,
  backing: NSBackingStoreBuffered
  defer: NO];
The thing to note are the colons “:” in the original method signature. When you convert
and Objective-C method to JS you remove the colons and capitalize the first letter
following it. When you see two items in brackets “[]”, that is calling a method
of a class or object. [NSWindow alloc] calls the alloc method
of NSWindow. For JS, convert those to dot-notation and parenthesis
if necessary; NSWindow.alloc.
I think the rest of the code to create and display the window is straightforward-enough. I’ll skip any more detailed description of it. It takes time and a lot of reading the docs to understand what’s happening for each step along the way, but you’ll get there. As long as the window is showing up you’re doing great. Let’s do more.
We need a label, text field, and button in this window. We’ll use NSTextField
and NSButton to make that happen. Update your script with the
following code and then run the app.
ObjC.import("Cocoa");

var styleMask = $.NSTitledWindowMask | $.NSClosableWindowMask | $.NSMiniaturizableWindowMask;
var windowHeight = 85;
var windowWidth = 600;
var ctrlsHeight = 80;
var minWidth = 400;
var minHeight = 340;
var window = $.NSWindow.alloc.initWithContentRectStyleMaskBackingDefer(
$.NSMakeRect(0, 0, windowWidth, windowHeight),
  styleMask,
  $.NSBackingStoreBuffered,
false
);

var textFieldLabel = $.NSTextField.alloc.initWithFrame($.NSMakeRect(25, (windowHeight - 40), 200, 24));
textFieldLabel.stringValue = "Image: (jpg, png, or gif)";
textFieldLabel.drawsBackground = false;
textFieldLabel.editable = false;
textFieldLabel.bezeled = false;
textFieldLabel.selectable = true;

var textField = $.NSTextField.alloc.initWithFrame($.NSMakeRect(25, (windowHeight - 60), 205, 24));
textField.editable = false;

var btn = $.NSButton.alloc.initWithFrame($.NSMakeRect(230, (windowHeight - 62), 150, 25));
btn.title = "Choose an Image...";
btn.bezelStyle = $.NSRoundedBezelStyle;
btn.buttonType = $.NSMomentaryLightButton;

window.contentView.addSubview(textFieldLabel);
window.contentView.addSubview(textField);
window.contentView.addSubview(btn);

window.center;
window.title = "Choose and Display Image";
window.makeKeyAndOrderFront(window);
If things worked you’ll now have a window with controls. You can’t type in the text field and the button doesn’t do anything, but hey, we’re getting somewhere.

What did we do in that addition? textFieldLabel and textField
are similar. They’re both instances of NSTextField. We make them
in a similar way as we made the window. When you see initWithFrame
and NSMakeRect, it’s a good sign that the script is creating
a UI element. NSMakeRect does what it says. It makes a rectangle
with the given position and dimensions; (x, y, width, height). That
creates what’s called a struct in Objective-C. In JavaScript we’d refer to it as an
object or hash or maybe dict. It’s a thing with keys and values.
After creating the text fields we set a handful of properties on each to get the
results we’re looking for. Cocoa doesn’t have anything like the html label
element. For that we make our own by disabling editing and background styling.
We’ll populate the text field programmatically, so we disable editing on it as well. If we didn’t need that, creating a standard text field is a one-liner.
For the button we use NSButton. Like the text fields, creating
it requires drawing a rectangle. There are two properties that stand out;
bezelStyle and buttonType. The values for both are
constants. These properties control how the button will render and the style
it will have. Check out the NSButton
docs
to see everything you can do with it. I also have
an example app
that shows the different button types and styles in action.
The last new thing we do is add the elements to the window with addSubview.
When I first tried this I did window.addSubview(theView). That works
for other standard views that you create with NSView, but not for
instances of NSWindow. I’m not sure why that is, but for windows you
need to add sub views to the contentView. The docs describe it as;
“The highest accessible NSView object in the window’s view hierarchy”. Works for
me.
When clicking the Choose an Image button, we want a panel to open that shows files on our computer. Before we do that, let’s warm up by logging a message to the console when clicking the button.
In JavaScript you bind event listeners to elements to handle clicks. Objective-C doesn’t use quite that same concept. It has what’s called message passing. With it, you send a message containing a method name to an object. That object needs to have information about what to do when it receives a message containing the method name. That may not be a spot-on description, but it’s how I understand it.
The first thing we need to do is set the button target and action.
The target is the object we want to send the action
to. If this doesn’t make sense now, just keep going and it’ll get more clear
when you see the code. Update the button setup part of the script with the
following properties.
...
btn.target = appDelegate;
btn.action = "btnClickHandler";
...
appDelegate and btnClickHandler don’t exist yet. We need to
make them. In the next addition to the script, order matters. I put
comments in the following code to show where you should add the new stuff.
ObjC.import("Cocoa");

// New stuff
ObjC.registerSubclass({
name: "AppDelegate",
methods: {
"btnClickHandler": {
types: ["void", ["id"]],
implementation: function (sender) {
\$.NSLog("Clicked!");
}
}
}
});

var appDelegate = \$.AppDelegate.alloc.init;
// end of new stuff

// Below here is in place already
var textFieldLabel = $.NSTextField.alloc.initWithFrame($.NSMakeRect(25, (windowHeight - 40), 200, 24));
textFieldLabel.stringValue = "Image: (jpg, png, or gif)";
...
Run the app, click the Choose Image button, and watch Console. Do you see “Clicked!” when you click the button? If so, that’s pretty darn cool right? If not, double check your script matches the code here and look for any errors in Console.
What’s this ObjC.registerSubclass all about? Subclassing is a way
to create a new class that inherits from another Objective-C class. Side note; the likelihood
I’m using incorrect terminology here is through the roof. Bear with me.
registerSubclass takes a single argument;
a JS object with the members of the new object. Members can be; name,
superclass, protocols, properties, and
methods. I’m not 100% sure that’s an exhaustive list, but that’s what’s
in the release notes.
That’s all well and good, but what did we do there? Since we didn’t provide a
superclass we inherited from NSObject. That’s the root
class of most Objective-C classes. Setting a name let’s us reference
the object later through the bridge with $ or ObjC.
$.AppDelegate.alloc.init; creates an
instance of our AppDelegate class. Again, notice we don’t
use parenthesis with the alloc or init methods since
we’re not passing arguments.
You create a method by giving it any string name. In this case “btnClickHandler”.
Give it an object with types and implementation members.
I haven’t found official docs for what the types array should
contain. Through trial and error I found it goes like this:
["return type", ["arg 1 type", "arg 2 type",...]]
btnClickHandler won’t return anything so we set the return type to void.
It takes one parameter, the sender object. In this case it will be the NSButton
we named btn. We use the “id” type because represents any object.
The full list of types is in the release notes.
implementation is a normal function. Inside of it you write
JavaScript. You have the same access to the $ bridge as you do
outside of an object. You also have access to variables you create outside
the function.
You can implement existing Cocoa protocols with sublcasses,
but there’s a “gotcha”.
I found out that if you use the protocols array your script
will just stop with no errors. I wrote an example and explanation
that you’ll want to have a look at if you’re doing that type of thing.
We’re ready to open the panel, choose an image, and display it. Update the
btnClickHandler implementation function with following code:
...
implementation: function (sender) {
  var panel = $.NSOpenPanel.openPanel;
  panel.title = "Choose an Image";

var allowedTypes = ["jpg", "png", "gif"];
// NOTE: We bridge the JS array to an NSArray here.
panel.allowedFileTypes = \$(allowedTypes);

if (panel.runModal == \$.NSOKButton) {
// NOTE: panel.URLs is an NSArray not a JS array
var imagePath = panel.URLs.objectAtIndex(0).path;
textField.stringValue = imagePath;

    var img = $.NSImage.alloc.initByReferencingFile(imagePath);
    var imgView = $.NSImageView.alloc.initWithFrame(
    $.NSMakeRect(0, windowHeight, img.size.width, img.size.height));

    window.setFrameDisplay(
      $.NSMakeRect(
        0, 0,
        (img.size.width > minWidth) ? img.size.width : minWidth,
        ((img.size.height > minHeight) ? img.size.height : minHeight) + ctrlsHeight
      ),
      true
    );

    imgView.setImage(img);
    window.contentView.addSubview(imgView);
    window.center;

}
}
The first thing we do is create an instance of an NSOpenPanel. If
you’ve ever selected a file to open, or a location to save a file you’ve seen
panels in action.
We only want the app to open images. Setting allowedFileTypes lets
us specify the allowed types for the panel. It expects an NSArray. We create
a JS array with allowedTypes, but we need to convert that to an
NSArray. We make that conversion with $(allowedTypes).
This is another use of the bridge. You use it in this way to bridge
a JS value to Objective-C. To bridge an Objective-C value to JavaScript you’d
use $(ObjCThing).js.
We open the panel with panel.runModal. That pauses code execution.
When you click Cancel or Open, the panel will return a value.
If you clicked Open, the contstant value of $.NSOKButton is returned.
The other note about panel.URLs is important. In JS, we access
the first value of an array with array[0]. Because URLs
is an NSArray we can’t use bracket notation. Instead we use the objectAtIndex
method. They both give the same results.
Once we have the URL of the image we can create a new NSImage.
Since it’s common to create an image from a file URL, there’s a handy method
doing it:
initByReferencingFile
We create an NSImageView using the same process we did for creating
other UI elements. imgView handles displaying the image.
We want to change the width and height of our window to match the width and height of
the image. We also want to make sure we don’t go below a minimum width or height.
We use setFrameDisplay to change the size of the window.
We wrap things up by setting the image view image and adding it to the window. Since its width and height have updated we re-center the window.
And that’s our little app. Kick it around, open a bunch of images. And yes, animated gifs will display and play so be sure to try some.
So far, we’ve been running the app from Script Editor
with opt + cmd + d. You run the actual app by double clicking
its icon like any other application.

You can update the app icon by replacing /Contents/Resources/applet.icns.
To access the app resources, right click on the app icon and choose “Show Package Contents”.
I’m excited about this because I think it has a lot of potential. Here’s how I’ve been thinking about it. When Yosemite is available, anyone that installs the OS will be able to sit down and write a native application. They will be able to do so using one of the most ubiquitous programming languages that exists. They won’t need to download or install anything extra. You don’t even have to install or open Xcode if you don’t want to. That removes a massive barrier to entry. It’s incredible.
I know there’s a whole lot more to building OS X apps than just being able whip up a quick script. I don’t have any illusions that JavaScript will become the defacto way to build for the Mac. I do think this will allow developers to build small apps that make development easier for themselves and for other people. Have a team member that’s not so comfortable using the command line? Build a quick GUI for them. Need a quick, visual way to create and update a large configuration file? Make a little app for it.
Other languages have these capabilities. Python and Ruby have access to the same native APIs and people make apps using those languages. Something just feels different about being able to use JavaScript. It feels subversive. It feels like some of the DIY of the Web knocking on the door of the Desktop. Apple left the door unlocked, I’m inviting myself in.
Thanks for reading